CAUTION: TRAINING ESSENTIAL.
Before using this product, you must read and understand all the instructions for use.
REF: 8555440
2023
Before using this product, you must read and understand all the instructions for use.
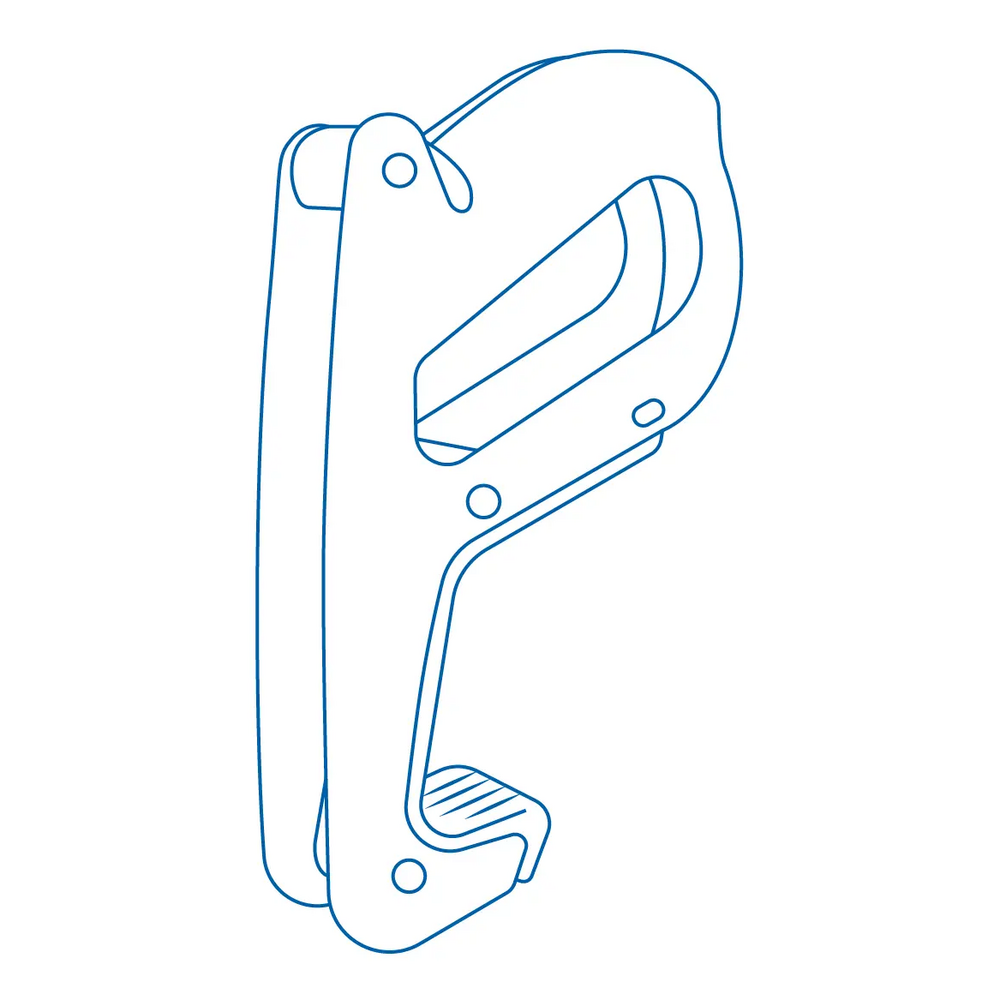
A - Rope slot
B - Carabiner attachment point
C - Handle
D - Palm rest

half rope

The Tubik ABS is a manual braking device for sport climbing and mountaineering. It provides additional braking assistance for greater comfort and safety. It is a Type 2 device: «Devices for belaying and abseiling without a friction adjustment function» with instructions, in accordance with standard 15151-2:2012 and UIAA 129.
The Tubik ABS is designed for belaying only: we do not recommend its use for abseiling.
This product is not designed to be used as a direct belay on a belay point.
This product has been designed for use with personal protective equipment against falls from a height that meets the applicable standards.
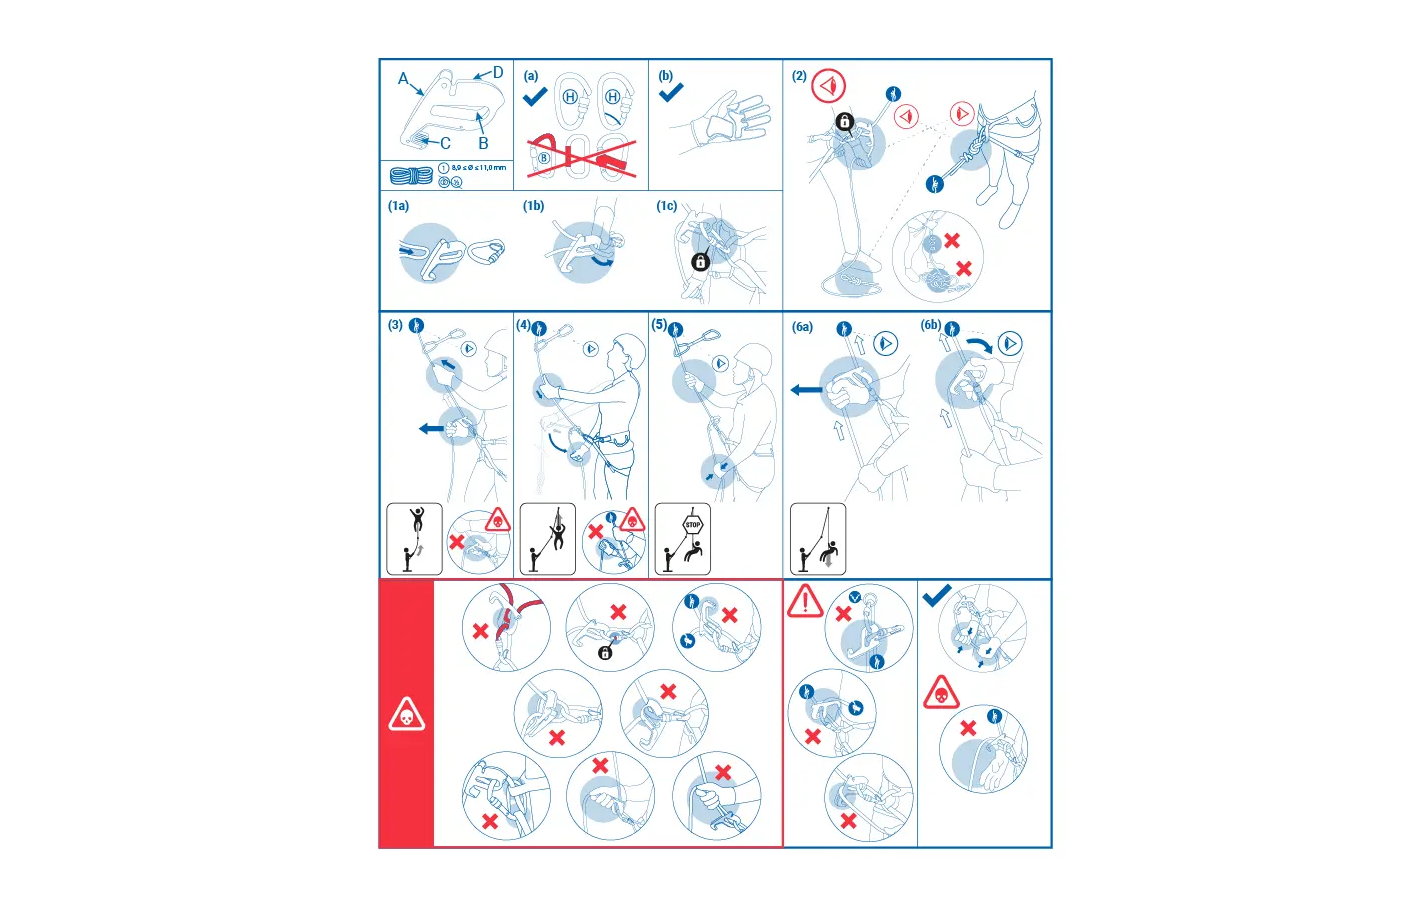
This device must only be used with single dynamic ropes, conforming to EN 892, with a diameter of between 8.9 and 11.0 mm. It must not be used with a wire rope, or for connecting on a cable, or for zip-lining, or for ascending on a rope.
The commercial diameters given for ropes have a tolerance of up to ± 0.2 mm. Harnesses often have different characteristics.
Make sure that you attach the belay system in accordance with the instructions of your harness manufacturer.
Ensure that the components of the belay system are compatible with each other and that none of the components of the belay chain affect the operation and safety functions of any other component.
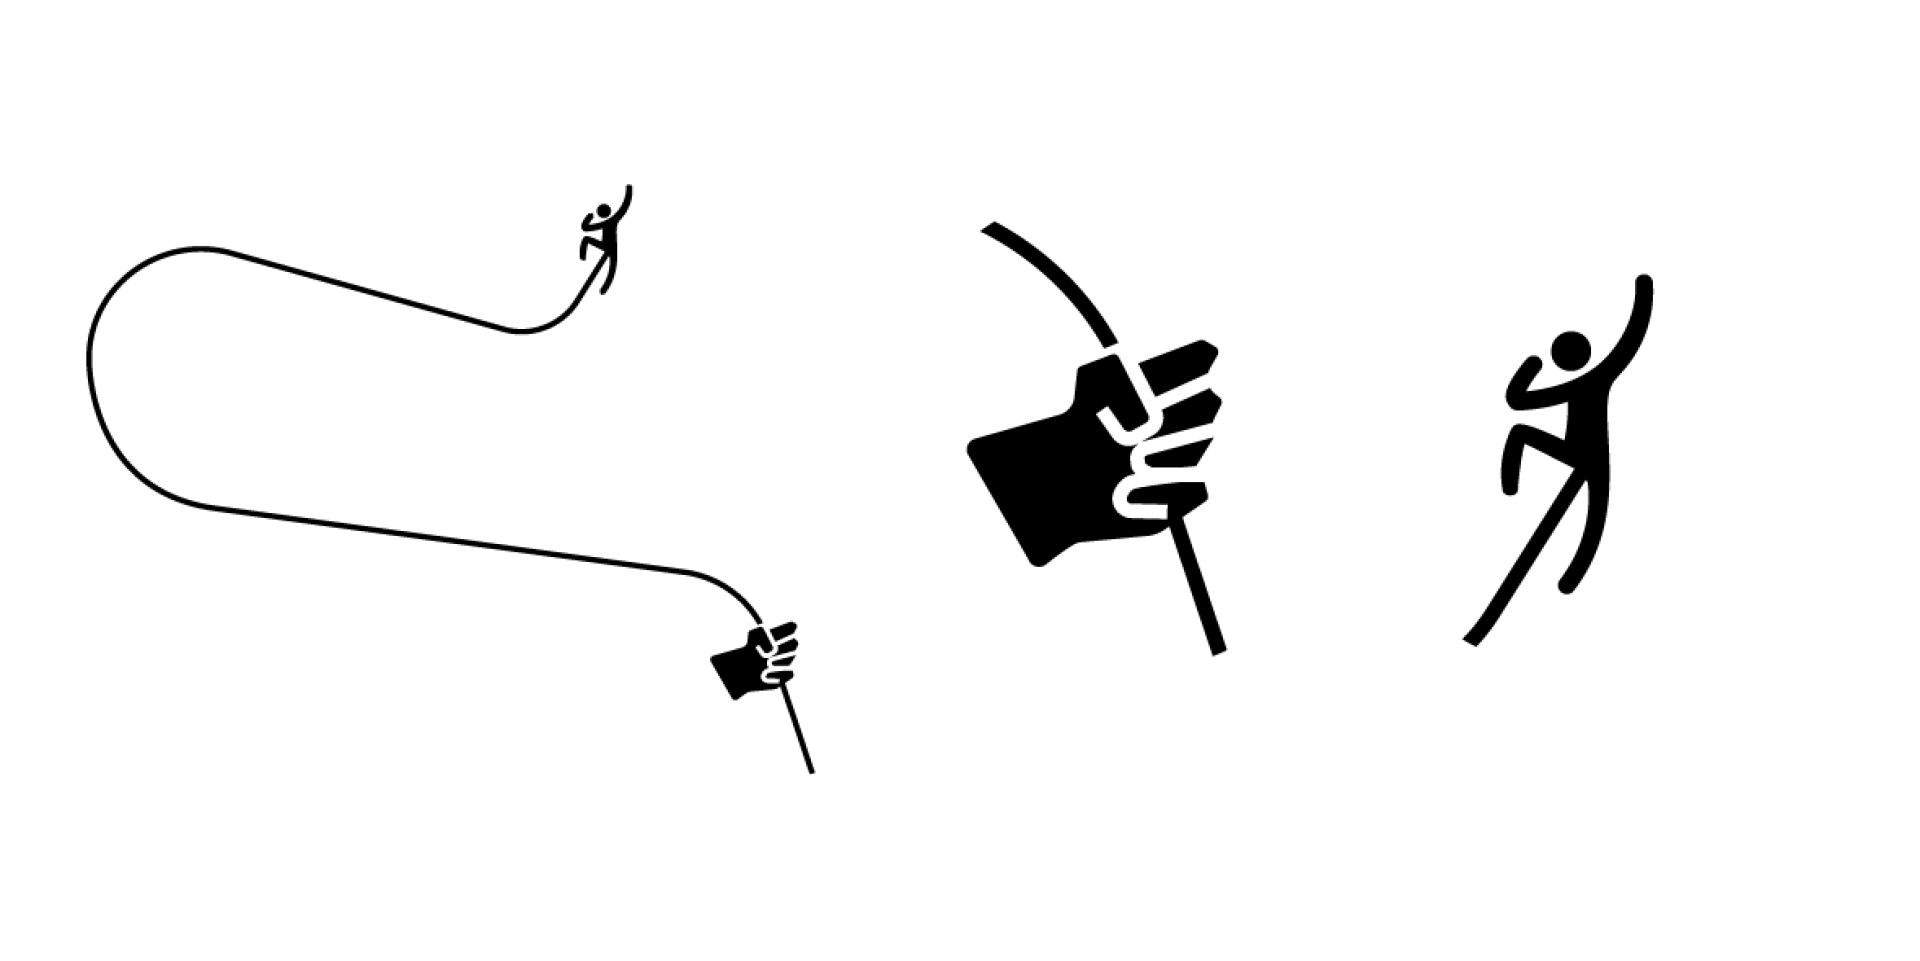
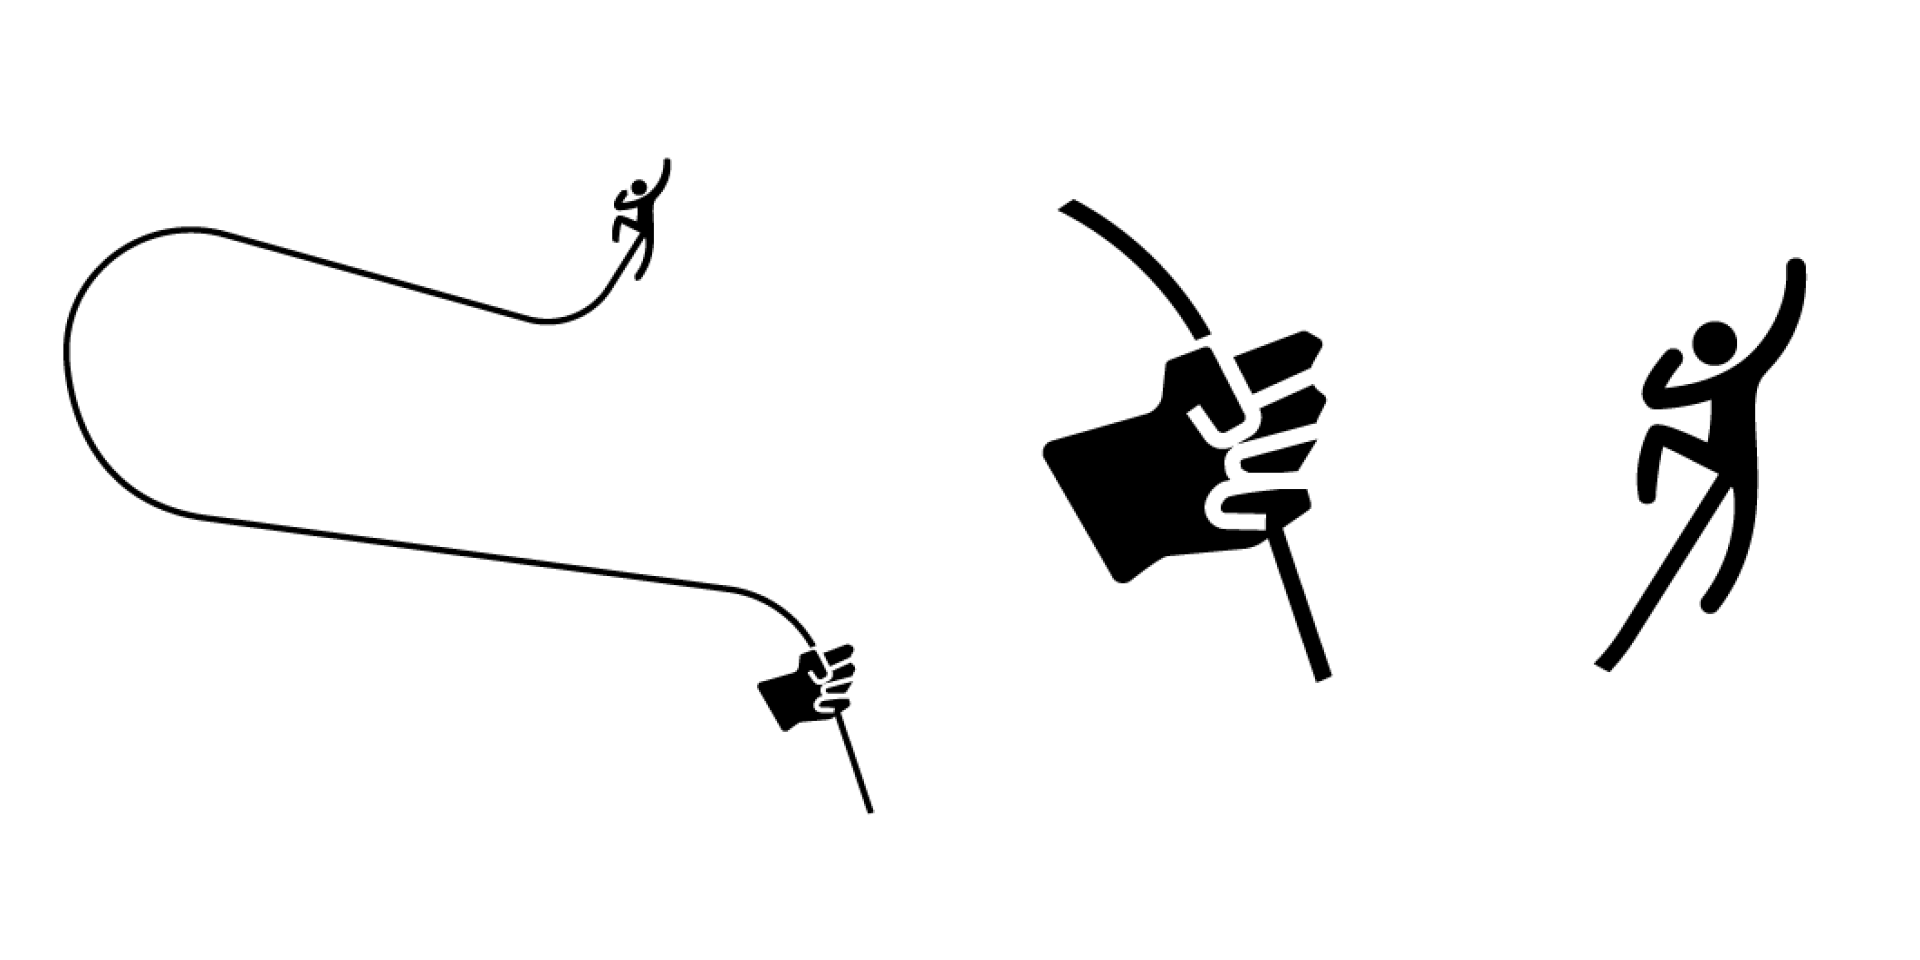
Caution! This device does not lock the rope in all circumstances. It is imperative that you always control and never let go of the «lifeline» (the free end of the rope that runs from the belay device to the ground): it is your responsibility to hold the climber.
You must keep an eye on your climber at all times and not allow yourself to be distracted.
Practice using your device in a safe place. It is the user’s responsibility to become familiar with the braking effect available with the rope and carabiner you are using before each use.
Attention, please note that the diameter of your ropes as well as other characteristics (impact force, weight, number of permissible falls,...) can vary significantly depending on their degree of wear and tear and the weather conditions.
The braking capacity of your device varies according to the rope diameter used and its state of wear.
The braking capacity of the device can also be affected by moisture, rain and freezing of the rope.
Thin ropes require more experience than large diameter ropes in handling them, as they are more difficult to block when the climber falls. A new rope or one designed to be flexible can be slippery (e.g. Simond Edge rope).
The geometry of the carabiner used with the device has a very strong influence on braking. We recommend the use of HMS type safety karabiners with a circular cross-section in the area in contact with the braking device.


The use of a safety karabiner with a long axis positioning aid (BLC) is recommended (a) (the SIMOND Goliath BLC karabiner is recommended). The weight of the climber should also be taken into account in the effectiveness of the braking system, as well as the weight difference with the belayer: a thick rope is preferable as soon as the climber weighs more than 80 kg. Be sure not to let your hair, clothing and braking hand get caught in any type of belay system during use, as this can cause serious injury. We recommend wearing belay gloves (b) and a helmet for safe practice. Never use the karabiner attachment point (B) as an anchor point: risk of serious accident and death.
Only persons trained and competent in mountaineering and climbing techniques or under the direct and constant visual control of persons trained and competent in these techniques are permitted to use this equipment. Do not use this equipment without prior training if you have any doubts or misunderstandings about the operating instructions. You are also responsible for keeping up to date with the latest updates to your equipment. It is impossible for us to consider all possible misuses of this product. Any use other than that described in this manual is prohibited. Failure to observe any of these warnings may result in serious injury or death. If you have any doubts or do not understand the instructions, please contact us via Decathlon Customer Service.
Uncoil your rope neatly. Insert a single rope loop into the rope slot of the belay system. At this stage, you must respect the direction of rope assembly indicated by the markings on the product (climber’s side/hand side): (1a)

Pass a locking carabiner through the carabiner attachment point (B) on the device and into the rope loop. Connect the carabiner to the harness so that it is oriented in its long axis with the narrower part on the side of the harness (1b). Ensure that the handle belay device is correctly oriented towards the ground. Lock the carabiner (1c).
Check that each component is correctly positioned and functional before each use. Remember to always perform the «partner check» procedure before climbing (figure 2):
- check the tightness of the harness
- check the climber’s knot and roping point
- check that the belayer’s carabiner is locked, that the rope and device are mounted in the right direction according to the marking on the device and that the device is locked
- Check that there is a knot at the end of the rope.
Make sure your rope is properly stowed and not twisted.
- Giving slack: (figure 3) The hand on the free end holds the rope while pushing the handle forward with the thumb while the hand on the climber’s side pulls the desired length of rope off the device. The pressure on the handle should be released as soon as the slack is taken up.
- Taking up slack: (figure 4)
Use the 5-step belay technique (training required) to never let go of the free rope. After swallowing the rope, always bring the hand back down to the blocking position as quickly as possible.
- Holding a fall: (figure 5)
- Hold the free end of the rope firmly downwards.
- Take up the rope on the way up (figure 4) Use the 5-step belay technique (training required) to never let go of the free rope. After pulling the rope, immediately return the hand to the locking position under the descender. The braking hand should never remain in the upper position above the braking device.
- Gradually rotate the device so that the handle is raised until the desired descent speed is achieved:
- either by pushing the handle forward with your thumb (6a)
- or by holding the device with your full hand on the palm rest area (6b).
At least one hand should always hold the rope under the braking device. During a long and fast descent, there is a risk of overheating the carabiner, which can cause burns. So control your speed.
- Never let go of the free end of the rope: there is a risk of falling, which can result in serious injury to the climber and the belayer.
- To make the fall more dynamic, use the belayer’s body movement.
Caution: never hold the device in your hand while using it, except during the descent phase. Make sure you always have a rope deflection point in a quickdraw when belaying the leader (figure 3).
Check the condition of your equipment before, during and after each use:
- Check for cracks, deformations, corrosion, wear or any other damage,
- Check for sharp edges due to wear that could damage the rope.
If you have any doubts about the condition of your equipment or if your product has a defect, destroy it to ensure that it is not used again. A thorough inspection should be carried out at least once a year by a trained person.After a major fall, your product and other parts of the belay chain should be replaced. The safety of the user is linked to maintaining the efficiency and strength of the product.
Your product should be cleaned with clean water and wiped dry to remove any moisture. In case of contact with sea water or marine atmosphere, rinse and air dry your equipment.
Store your product in a dry, cool and ventilated place, away from light and heat sources.
Prolonged storage of your equipment in poor conditions may render it unusable.
Avoid any contact with chemical products (acids, bleach, petrol, diesel, solvents, etc.) which could degrade the resistance of your product and its braking effect. Check the condition of your equipment before each use (see paragraph 5).
Any modification or repair of the product is strictly forbidden.
The maximum life span of SIMOND products is given from the date of manufacture indicated on the product:
- 10 years for products subject to ageing (textiles and plastics)
- for life for metal products and parts.
The actual lifetime of your SIMOND product depends on the frequency and type of use of each user. Under normal conditions of use and maintenance, SIMOND recommends a service life of 3 to 10 years for braking devices. This service life can be reduced to one use in case of a major fall of the product, overloading, jamming and twisting, intensive use (wear and tear and presence of sharp edges) or heavy stress (exposure to chemicals, extreme temperatures, aggressive environments...). As long as your product meets the requirements of the inspection described in the section on INSPECTION, there is no need to dispose of it. The use of a dirty rope can significantly reduce the life of your product. If in doubt about the condition of the product, have it checked by a competent and trained person or destroy it.
This SIMOND product comes with a 2-year guarantee, starting from the date of purchase, covering any manufacturing defaults. Normal wear and tear as well as any damage resulting from misuse or modification, or inappropriate storage or maintenance of the product are excluded from the warranty.
TUBIK ABS: Product name
EN 15151-2:2012: braking device compliant with standard EN 15151-2:2012
UIAA 129: This product complies with the UIAA 129
XXMMYY: 6-digit traceability number.The first 2 digits form the batch number, the next 4 indicate the month and year of manufacture.

Simond Logo
rope direction and identification of the climber side and the brake-hand side

minimum and maximum rope diameter usable with the device

Refer to the manual before using this equipment