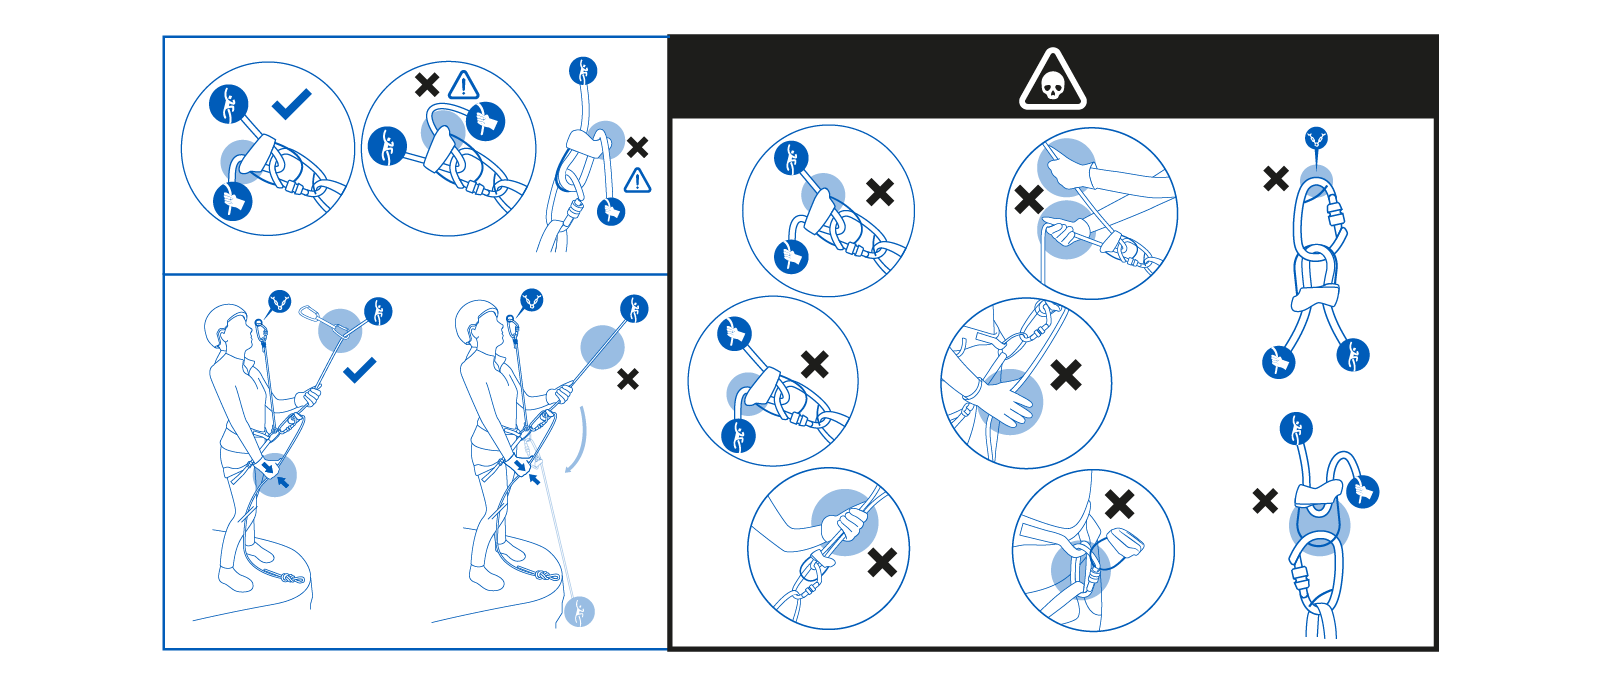
WARNING

CAUTION: TRAINING ESSENTIAL
Before using this product, you must read and understand all the instructions for use.
Rock climbing and mountaineering are dangerous.
It is your responsibility to learn the necessary techniques for these activities and to use the equipment correctly.
This device may only be used by qualified and/or competent persons, or under the direct supervision of a qualified and/or competent person.
Do not use this equipment without prior training or if you have any doubts.
You are also responsible for making sure you're aware of any updates concerning your equipment. Improper use poses additional risks.
We cannot envisage all of the incorrect uses of this harness. Hence, any use other than that described in this user guide is strictly prohibited. Failure to respect any of these warnings may result in serious injury or death. If you are unsure or have not understood this user guide, do not hesitate to contact us via Decathlon Customer Service.
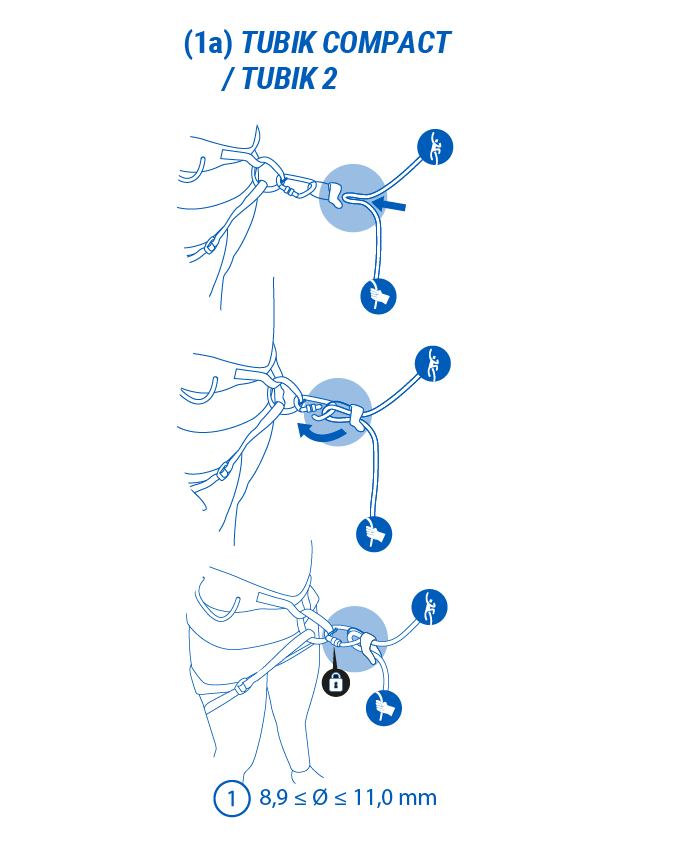
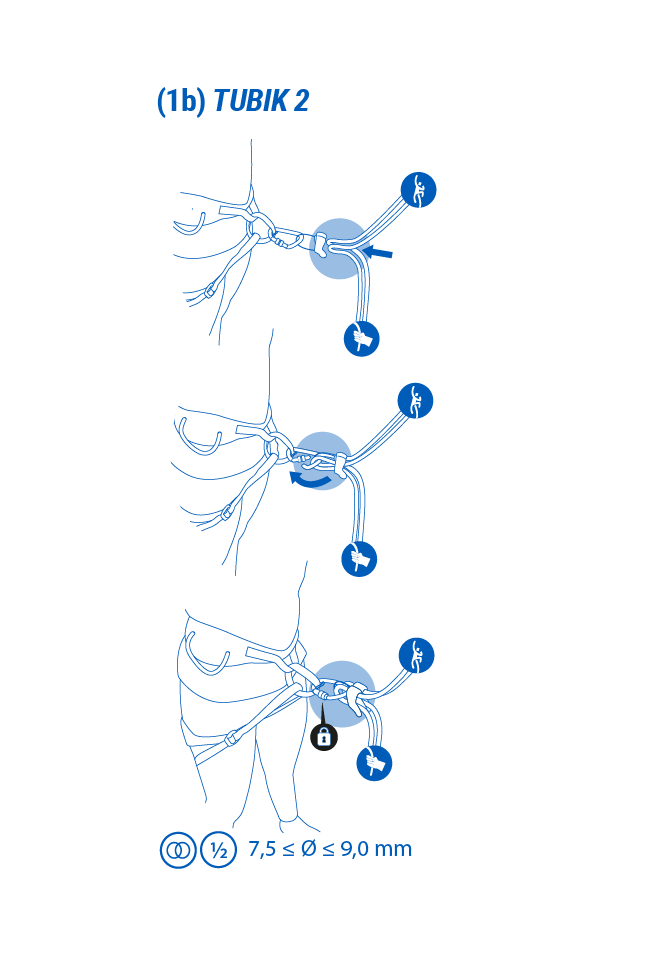
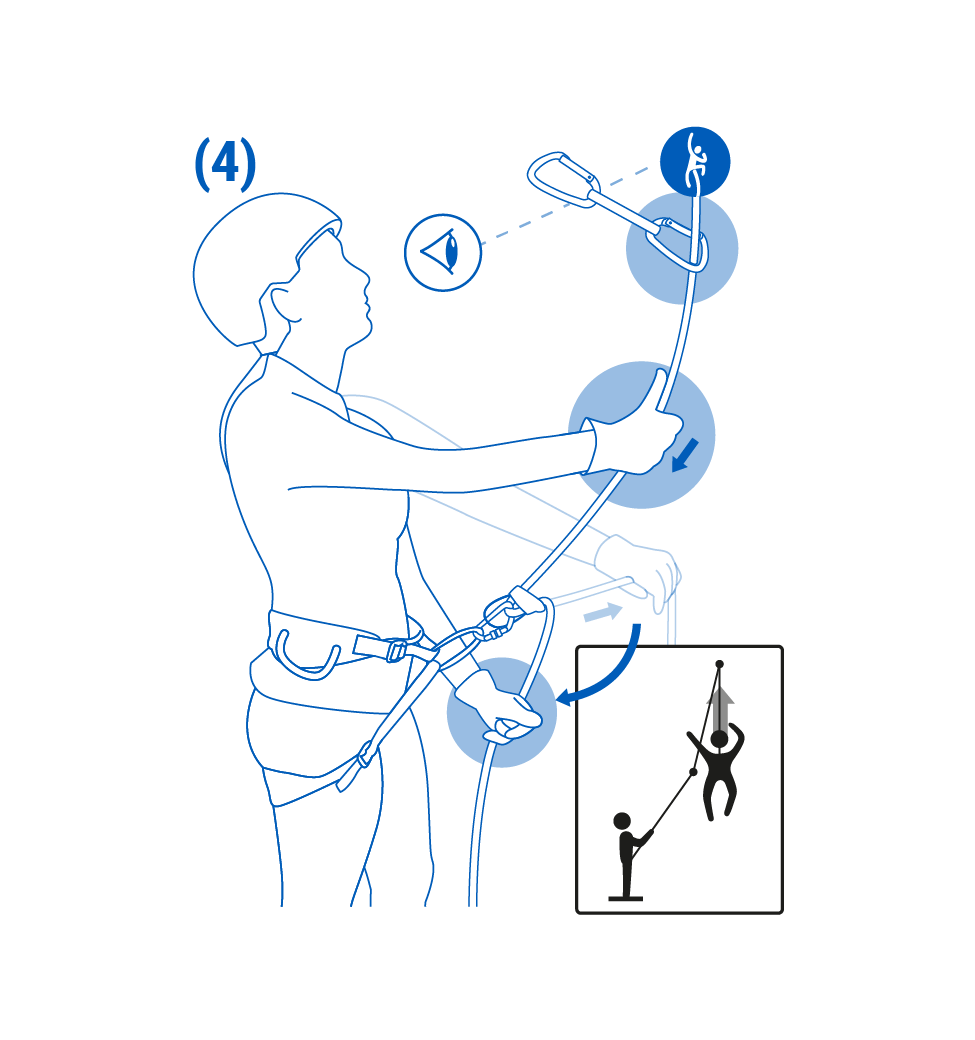
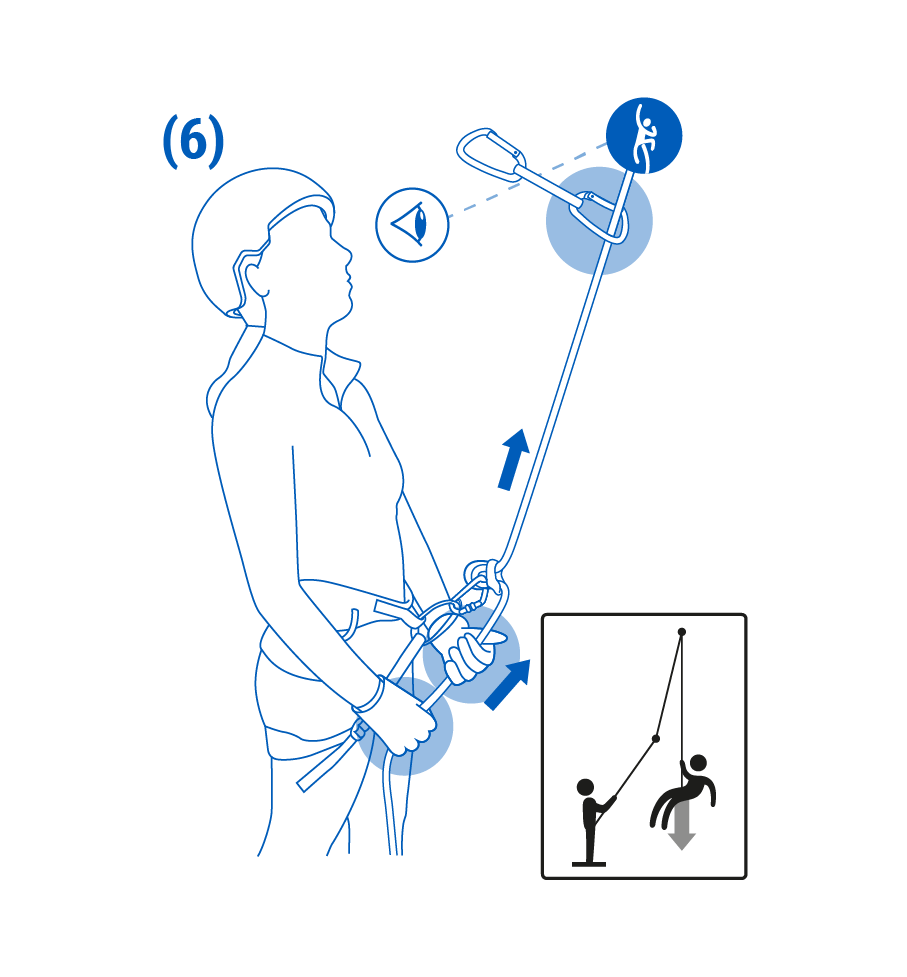
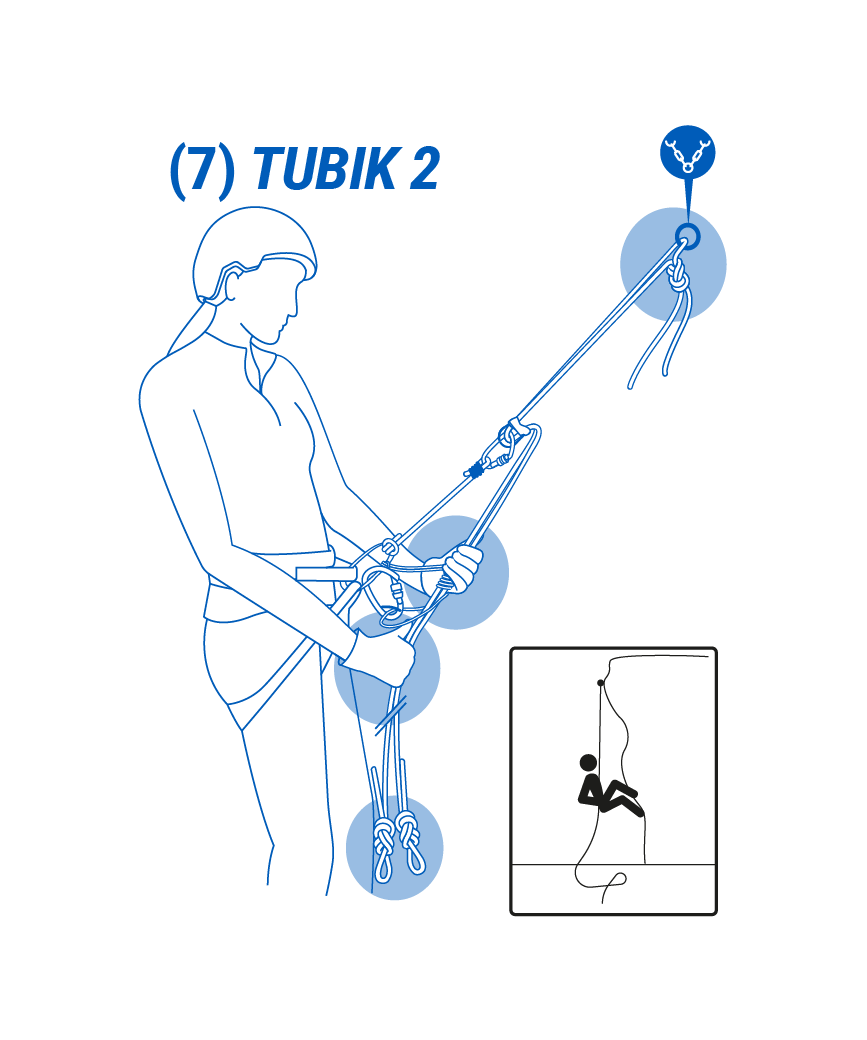
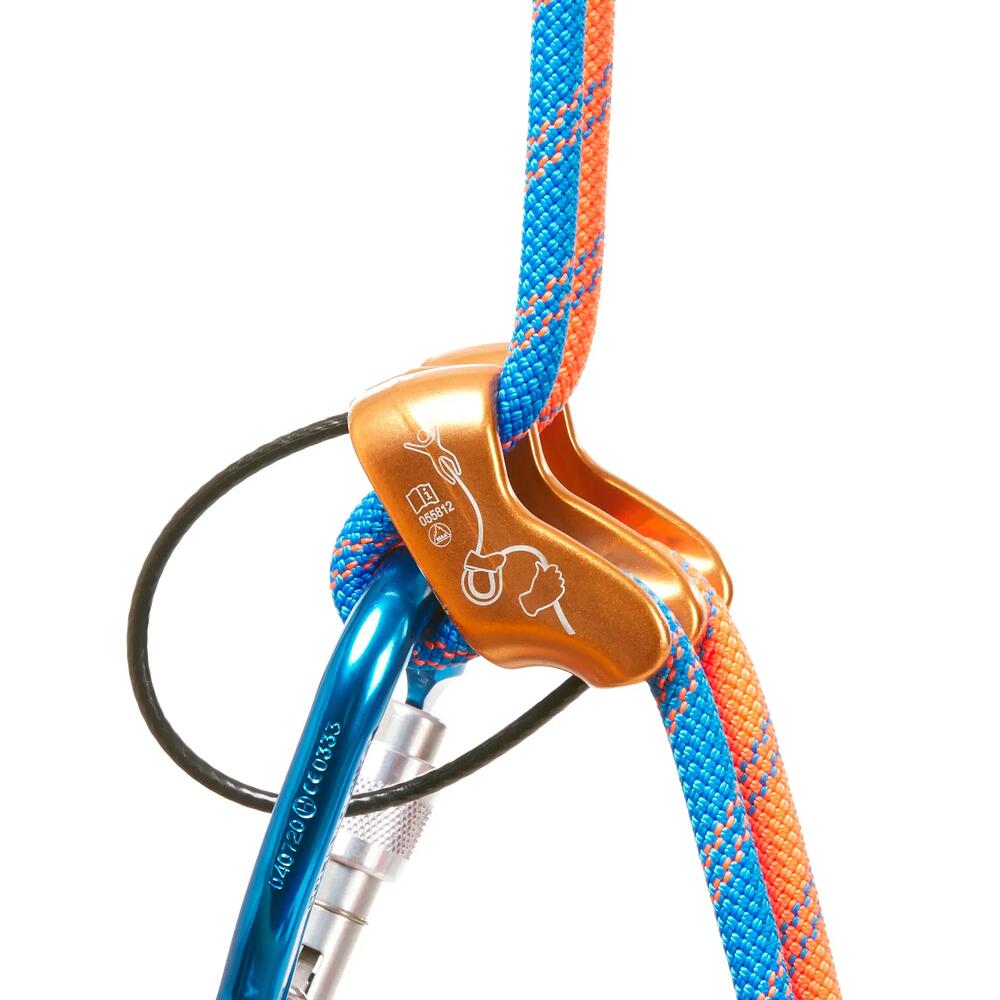
This braking device is designed to be used with personal protective equipment to prevent falls from height in accordance with current standards.

1 – PARTS LIST

TUBIK 2 / TUBIK COMPACT USER GUIDE

A – Cable
B – Rope slot(s)
C – Braking groove(s)

1 – Parts list

Single rope, 
half ropes, 
twin ropes

2 - USE

2.1. Overview
The Tubik 2 and the Tubik Compact are manual braking devices intended for sport climbing or mountaineering.  These are Type 2 devices:  "devices for belaying and abseiling without a function to adjust the friction" accompanied by a user guide, in accordance with standard 15151-2:2012 and UIAA 129. These products are not designed to be used to belay directly off an anchor.
These devices must be used with dynamic ropes that comply with standard EN 892. They must not be used with metal cables, nor for hanging off a cable, nor on a zip line.
The nominal diameter of a rope has a tolerance of up to ± 0.2 mm. Make sure your device is compatible with the other components of the belay chain. Harnesses often have different features. You must attach the belay system as instructed by your harness manufacturer.

Caution! These devices are not self-locking. It is imperative to constantly control it with your hand and to never let go of the "lifeline(s)" (the dead end of the rope that runs from the belay device to the ground): you are responsible for holding the climber. You must constantly watch your climber and not get distracted.

2.2. Tubik 2 suitability
The Tubik 2 is designed for belaying and abseiling on two strands of rope. It is designed to be used with single ropes with a diameter of 8.9 to 11.0 mm or with half or twin ropes with a diameter of 7.5 to 9.0 mm. When half ropes are used, they must be of the same diameter.

2.3. Tubik Compact suitability
The Tubik Compact is designed for belaying only. We do not recommend using it for abseiling. The Tubik Compact can only be used with single ropes with a diameter of 8.9 to 11.0 mm. 

2.4. Tubik 2 and the Tubik Compact suitability
Practice handling your device in a safe place and familiarise yourself with its behaviour with the ropes you are using. Please note that the diameter of your ropes as well as other features (impact force, weight, rated number of falls, etc.) can vary significantly depending on its degree of wear and atmospheric conditions.

The braking effect of your device will vary depending on the diameter of rope used and its state of wear: a new rope can be slippery. The braking capacity of the device can also be affected when the rope is wet, damp or frozen. It is the user's responsibility to familiarise themselves with the braking effect of the device before each use. Thin ropes require more handling experience than large diameter ropes, as they are more difficult to block when a climber falls.
The weight of the climber should also be taken into consideration in the efficiency of the braking, as well as the difference in weight with the person belaying: a thick rope is best for climbers weighing more than 80 kg. Make sure that the slack rope runs freely through the braking groove to optimise braking efficiency.
The geometry of the carabiner used with the device has an influence on braking. We recommend using HMS safety carabiners, which have a sufficiently wide area in contact with our braking devices. We recommend using a safety carabiner with a positioning aid system along its major axis (BLC) (a) (example: Simond Goliath screwgate Secure BLC).
Be careful not to let your hair, clothing or your brake hand get caught in any braking device during use as this can cause serious injury. We recommend wearing belay gloves (b) and a helmet for safe practice.
The cable of the device is not load bearing and is only used to keep the device close to the braking carabiner. Never use the cable as an anchor point: risk of serious injury which could result in death (c).

TUBIK 2 / TUBIK COMPACT USER GUIDE

2.5. Installing on the harness (Figure 1a-1b)

Pass a locking carabiner through the cable of the device, then connect it to the harness so that it is oriented along its major axis, with the narrowest part on the harness side. Make sure the belay device is correctly oriented (braking groove towards the ground).
Single rope (Tubik Compact or Tubik 2 - Figure 1a): feed a bight of rope through one of the rope slots

TUBIK 2 / TUBIK COMPACT USER GUIDE

- Half and twin ropes (Tubik 2 only - Figure 1b): feed a bight of rope through each of the two rope slots.
At this stage, you must install the rope as indicated by the markings on the product (climber side / hand side).
- Feed the bight(s) of rope through the carabiner and lock it.
- Refer to the diagram shown on the product to avoid any installation errors. Check that each element is correctly positioned and functional before each use.

TUBIK 2 / TUBIK COMPACT USER GUIDE

Don't forget to systematically carry out a mutual visual check ("partner check") before climbing (Figure 2):
- check the climber's knot and tie-in point
- check that the harnesses are snug
- check that the belayer's carabiner is locked, that the rope and device are properly threaded and perform a functional test of the device
- check that there is a knot at the end of the rope.
Make sure your ropes are properly laid out and not twisted. 

TUBIK 2 / TUBIK COMPACT USER GUIDE

2.6. LEAD BELAYING

- Giving slack: (Figure 3)
Feed the dead end of the rope(s) into the device, keeping the brake hand below the device. The guide hand pulls the rope(s) out of the device on the climber's side.

TUBIK 2 / TUBIK COMPACT USER GUIDE

- Taking up slack: (Figure 4)
Use the 5-step belay technique (training required) so that you never let go of the dead end of the rope. After pulling the rope, always bring your hand back down to the brake position as quickly as possible.

TUBIK 2 / TUBIK COMPACT USER GUIDE

- Holding a fall: (Figure 5)
Firmly hold down the dead end(s) of the rope.
Never let go of the dead ends of the rope: risk of falling, which could cause serious injury to the climber and their belayer.
Make sure you always have a quickdraw to redirect the rope when lead belaying 

TUBIK 2 / TUBIK COMPACT USER GUIDE

2.7. TOP ROPE BELAYING

Take up the rope during the ascent (Figure 4)
Use the 5-step belay technique (training required) so that you never let go of the dead end of the rope. After pulling the rope, immediately return your hand to the brake position under the descender. The brake hand must never remain in a position above the braking device. 

TUBIK 2 / TUBIK COMPACT USER GUIDE

Top rope lowering (Figure 6)
Both hands hold the rope(s) under the braking device. Gradually feed the rope through, ensuring that at least one hand is gripping the rope at all times (training required).

TUBIK 2 / TUBIK COMPACT USER GUIDE

2.8. ABSEILING

(only with the Tubik 2!)
- Use a lanyard connected to the harness and fitted with a safety carabiner. Attach the lanyard carabiner to the HMS locking carabiner used with the braking device. Feed the cable of the braking device through the HMS carabiner. Make sure the belay device is correctly oriented (braking groove towards the ground; load on the wide side of the carabiner oriented along its major axis). Always tie a knot at the end of each rope.
- Feed a bight of rope through each rope slot, threading as indicated by the icons. The hand controlling the rope must be on the same side as the braking grooves (see diagram on the product and Figure 7).
- Feed the bight(s) of rope through the carabiner and lock it.

The Tubik 2 requires the use of a back-up (autoblock knot) when abseiling to prevent any accidents if the user is forced to let go of the rope. This back-up should be positioned under the Tubik 2 via a carabiner attached to the tie-in loop of the harness (Figure 7).
Check that each element is correctly positioned and functional before each use.
Be sure to hold both strands of rope firmly using both hands throughout the descent (training required).
During a long and fast abseil, there is a risk of overheating the belay system which can, in the worst case, damage the rope, your harness and cause burns. Stay in control of your speed.

3 - CHECKS

Check that your equipment is in good condition before, during and after each use:
● Check for cracks, deformation, corrosion, wear or any other damage,
● Check for sharp edges due to wear, which could damage the rope.
If the product has a defect, a malfunction or if you have any doubts regarding the condition of your equipment, scrap it so that you can be sure that it will not be used again.
A thorough inspection must be carried out at least once a year by a qualified person.
Any repair or modification of the product is strictly prohibited.

4 - LIFESPAN

The maximum lifespan of SIMOND products, issued based on the manufacturing date indicated on the product, is the following:
- 10 years for textile and plastic products,
- lifetime for braking devices.

The actual lifespan of your SIMOND product depends on the frequency and way in which it is used by each individual user. Under normal conditions of use and maintenance, SIMOND recommends a lifespan of 3 to 10 years for braking devices.
This lifespan may be reduced to a single use in the event of the product falling from a significant height, intensive use with friction, sharp edges or in the event of excessive strain (exposure to chemical products, extreme temperatures, aggressive environments, etc.). Using a dirty rope can significantly reduce the lifespan of your product.
The ageing of your device may render it unusable. However, as long as the device meets the inspection requirements described above, there is no need to scrap or repair it.
If you have any doubts about the condition of a product, have it checked by a competent and qualified person or destroy it.

5 - 2-YEAR WARRANTY

This SIMOND product comes with a 2-year warranty, starting from the date of purchase, covering any manufacturing defaults.
Normal wear and tear as well as any damage resulting from misuse or modification, or inappropriate storage or maintenance of the product are excluded from the warranty.

6 - MAINTENANCE - CLEANING - STORAGE

Braking devices must be cleaned with clean water and left to dry away from sources of heat. Store them in a dry, cool, dry and well-ventilated place, away from heat and light.
Always rinse and dry your equipment after contact with seawater or a marine environment.
Avoid any contact with chemicals or corrosive substances (acids, bleach, oil, petrol, diesel, solvents, etc.).
Prolonged storage of your equipment in poor conditions may render it unusable; always check the condition of your equipment before each use (see paragraph 3).

7 – MEANINGS OF THE MARKINGS

XXYYMM: 6-digit traceability number: the first 2 digits form the batch number, the next 4 indicate the month and year of manufacture.
EN 15151-2:2012: braking device compliant with standard EN 15151-2:2012

  • TUBIK 2 / TUBIK COMPACT USER GUIDE

    Refer to the manual before using this equipment

  • TUBIK 2 / TUBIK COMPACT USER GUIDE

    this product complies with the UIAA 129 safety label

  • 7 – MEANINGS OF THE MARKINGS

    Manufacturer - SIMOND logo

  • TUBIK 2 / TUBIK COMPACT USER GUIDE

    product name

  • TUBIK 2 / TUBIK COMPACT USER GUIDE

    rope direction and identification of the climber side and the brake-hand side

  • TUBIK 2 / TUBIK COMPACT USER GUIDE

    minimum and maximum rope diameter usable with the device

TUBIK 2 / TUBIK COMPACT USER GUIDE